As the story goes, I was first inspired to begin a journaling practice after seeing a 5 year gardening journal for sale on one of the home shopping channels. With the book spanning such a long time period, the spaces to write for each day were rather small and this was key in helping me to understand that a writing commitment didn't have to lengthy.
I bought my first journal (a large blank Moleskine Reporter) in 2005. (Pen of choice at the time was a medium blue Paper Mate Stick) This book became my constant confidant for dream interpretation, stream of consciousness writing and other types of reflective writing practices.
Not long after after I began this practice, I developed a fair amount of pain in my right hand and wrist from the pressure needed for the ball point pen to deliver it's ink. Enter the fountain pen, (many, actually) which required little pressure to deliver the ink to the page. Add to that a hundred bottles of ink, and a few dozen more journals, and I was a happy camper. This became an extremely helpful practice (albeit expensive at times) to develop self awareness and I wouldn't trade it for the world.
To further my love for paper and the written word, I was granted the most glorious job- that of professional blogger for RhodaDrive.com. For 6 years I got to play with and write about paper and pens and writing. But I digress...

Fast forward a decade and I began to feel tremendously burdened by the box of old journals filled with so much bitching, whining and complaining- but I didn't yet know what to do with them. I'd thought about burning them, but didn't have a place for that to happen. Then one day last spring/summer (2016), I was suddenly inspired to shred them.
But first, I had to read them. Over 4000 excruciating pages of verbal diarrhea. This was brutal because I had a really hard time feeling compassion for the version of myself that wrote those words. Again and again I wanted to scream, "Get over it already!!!" Feeling so much frustration while reading the books, I began tearing them apart. Separating the pages so I could run them through the shredder meant seeing my words over and over and over again. None of this was easy. None of it.
When the shredding finally began, I couldn't do it fast enough and ran all the pages through the shredder with the widest part of the paper hitting the blades first. Bags filled with shreds later, I noticed something that made me to want to scream. Since I shredded the books longways, I could still see my words on the shredded paper. FUCK! I wanted SO MUCH to obliterate these words and these thoughts from my memory, so shredding them just wasn't good enough. So what could I do?
Then it came to me, pulp it. No real thoughts beyond that. Just, pulp it. My first trip was to Lowe's, where I bought three blue 5 gallon buckets with lids, a roll of nylon window screen, and a paint mixing attachment for my drill. For whatever reason, I opted not to blend the pulp to a smooth consistency. (Some people would use a blender but I felt like that would prolong the process even more.)
Filing the buckets with shreds, I boiled kettle after kettle and dumped hot water over the paper. This, like every part of this godforsaken process, took forever because I mistakingly thought that the paper would instantly dissolve when the hot water hit it. Ha!. It didn't. It soaked for days until it began to somewhat come apart with paint mixing attachment not being as helpful as I'd hoped. I began to manually agitate the paper with my hands then eventually with my whole arm up to the shoulder.
There was something really interesting and peaceful about that process - of plunging your arm into a bucket of purple paper pulp created from 20 years worth of written memories. It was like touching your life history in a whole different kind of way. (Despite using a rainbow of fountain pen inks, they somehow all blended into purple. Go figure.)
While I typically enjoy documenting and sharing the creative process, I took not a single photo during this time. I didn't photograph the books before I started, while I was tearing them apart, of me shredding them, or of the initial pulping process. Couldn't do it. Too personal. I was destroying a part of me and it had to just be me and it.
While the paper was slowing disintegrating in the blue buckets stacked in my kitchen, I began to watch YouTube videos on paper making. I had an idea of what to do, but I needed confirmation. The next trip to the store was to AC Moore where I bought two wooden frames to use as a mould and deckle and a dozen pieces of felt.
(This is where I began to document the process)
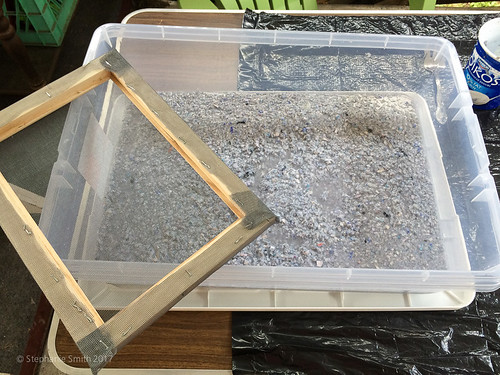
(In the image above, you can see that the shredded paper after soaking for something like a week was still somewhat chunky. Again, I could have chosen to use a blender to smooth it out but didn't. )
I stapled the nylon screen to one of the frames. It was a lot harder to staple into that wood than one might think - but then again, did I really expect ANY part of this process to be easy?
For the first batch of paper, I was submerging just one frame with the screen on the bottom. (Think panning for gold) While those sheets came out halfway decent, I watched a few YouTube videos and learned that with a proper "deckle and mould" the screen needs to be on top with a 2nd frame fitting over the screen to hold the pulp. The way I was doing it with the screen on the bottom was causing the screen to stretch and pulp to get caught in the areas between the staples and was making it difficult to flip the sheet out. For the second batch on, I awkwardly used the two frames as a deckle and mould set.
Of note: If there were cloth bookmarks in the books, they got shredded too - which is why you sometimes see black bits - though those are also sometimes from the front and back end covers of Rhodia Webnotebooks. Plastic Post-It flags also got shredded, though I picked them out as much as I could from the slop shown above.
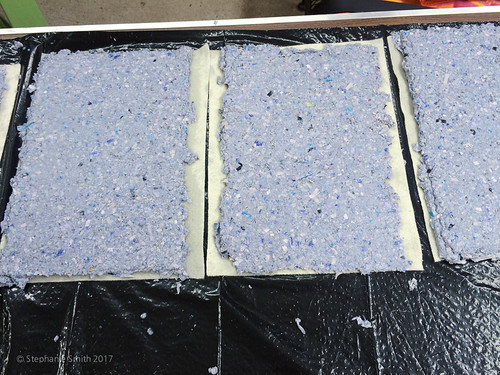
This whole process- from skimming through the content, shredding, pulping, and then making paper was seemingly endless. I had shredded and soaked two five gallon buckets full of thick pulp. Should I ever decide to make paper again. I won't create more pulp than I can use in a single paper making session.
After blotting out as much water as I could with a sponge while the pulp was still on/in the mould, I'd then flip out the molded sheets of "paper" (all of which varied quite greatly in thickness due to my impatience) onto sheets of felt and then I'd blot some more... (I found recycled paper making process videos on YouTube which created a stack of alternating paper and felt which was pressed between sheets of wood and placed in a box with a fan for air circulation. I didn't do that.)
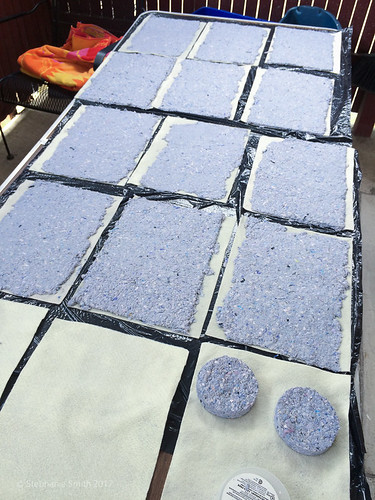
Over the course of about a month, I think I made 4 batches of about 15 9x12" pieces each. I also pressed some of the pulp into round plastic plate forms. When I mentioned above about how in the future, I'd only create as much pulp as I could use in a single session, this was because the pulp began to smell pretty funky after sitting around for a few weeks. I read that there were additives that could be put in the water to prevent this but I didn't pursue that. Whoops.
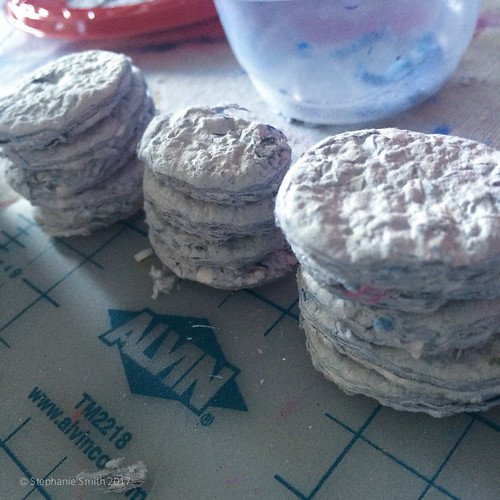
The bigger discs shown further down below, were my final attempts to use up the rest of the pulp because I was tired of making paper. They, along with the last batch of paper, still smell a bit sour... like vomit. Wheee!
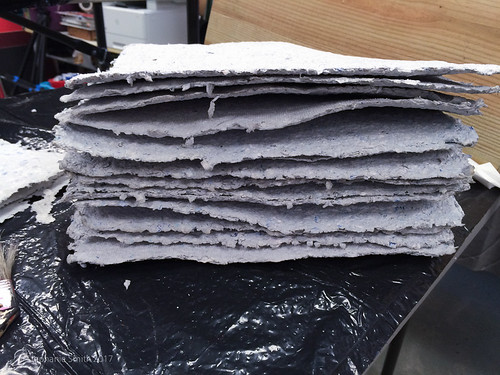
This is what some of the dried sheets look like. Some are very thick. Most are a bit warped. Some of the words from the paper shreds are still visible. (And I'm ok with that)
Depending on the thickness of each sheet, they took on average about 4-5 days for them to fully dry outside. One batch I dried in the sun took a little less time, but the color of the paper (a light blueish grey) was more bleached out and somewhat darker around the edges.
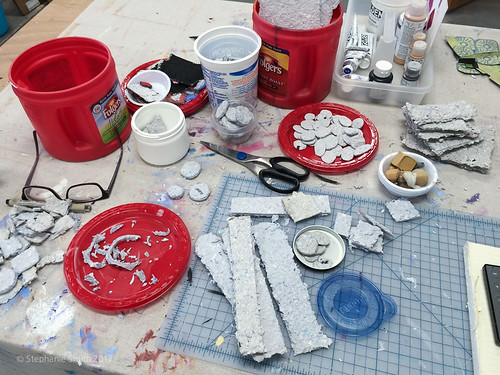
Okay, so... I have all this recycled paper. Now what? After I started cutting out some random oval shapes, it didn't take long for inspiration to strike.
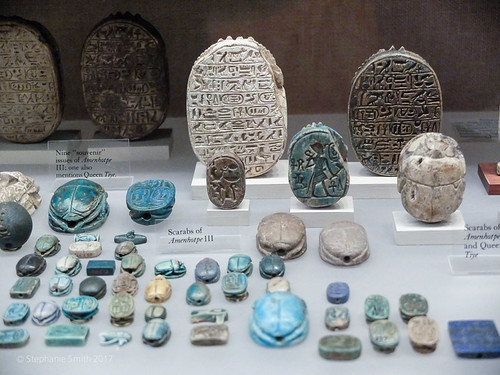
My first ever visit to the Metropolitan Museum of Art in New York City was in the spring of 2015 - a year before I began this project. Of all the wonderful and interesting things I saw on that trip, I found myself most attracted to the ancient Egyptian stone and ceramic scarab beetles.
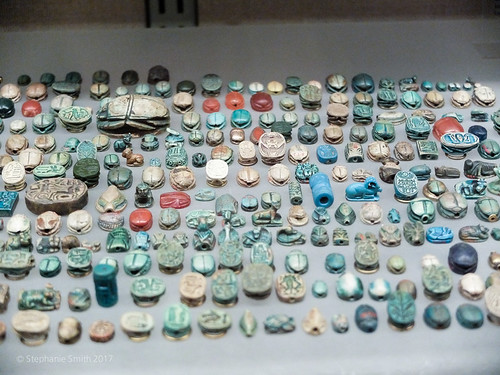
I loved the shapes, the colors, and maybe most of all, the way they were so precisely laid out in the exhibits. I could have sat and looked at them for hours.
It became obvious that I was to create my own Ancient Historical Artifacts. (Considering some of the writing I shredded went all the way back to 1995, I'd say that's a pretty accurate description.)
I had to use heavy shears to cut these forms out of the thick sheets which was really hard on the hands.
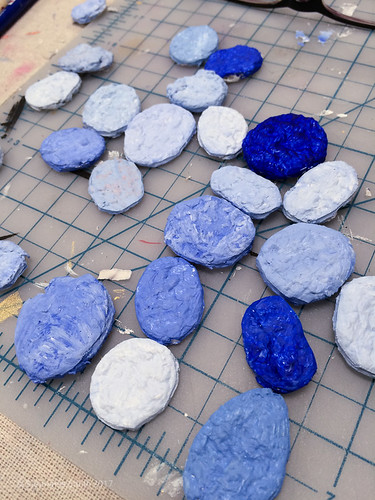
First experiments to paint them were with watercolor and gouache, but as the paint soaked in and didn't offer the look I was aiming for, I quickly switched to acrylic.
(Completely in love with the various shades of Egyptian blue, I did my best to create my own version.)
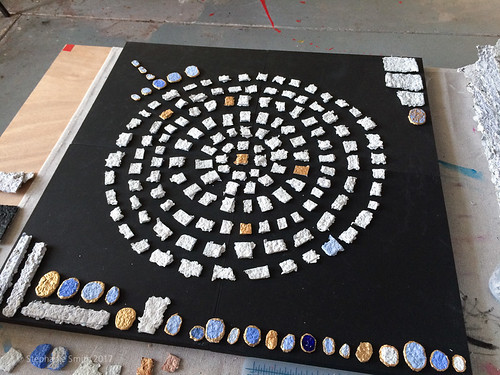
Once I painted a variety of shapes, I began playing with laying them out. In this first image, they are temporarily sitting on top of 4 12x12" cradled hardboards which I'd covered with black acrylic gesso.
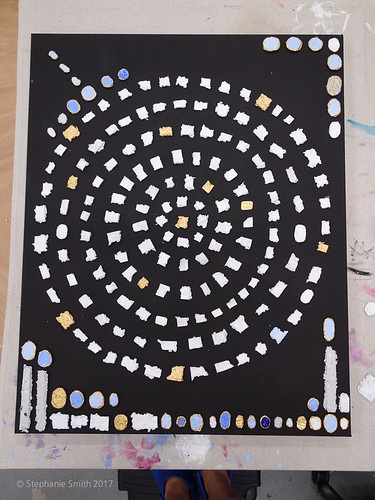
Still trying to find the right balance with the mandala design. These are now sitting on top of a 24x30" stretched canvas. (I abandoned the idea of using a stretched canvas because I didn't want to deal with the bounce of the canvas while trying to glue them down.)
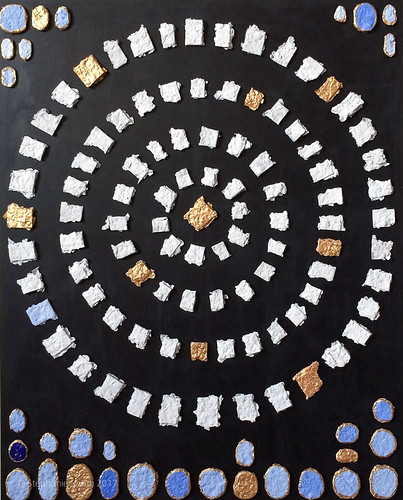
This is the final version of the first piece of "Ancient History."
I'd initially tried to use a ruler and compass to lay out the circles but it didn't work they way I wanted. I wanted the circles to be more oblong than round, and so I had to carefully and painstakingly check and recheck the layout as I was gluing to ensure it didn't go wonky.
The gluing process was of course, equally time consuming. As the pieces were unpainted on the back, an art conservationist friend suggested I use an archival PVA glue (Jade 403) which I applied with a paintbrush. I'd first place the piece, then hold it firmly for several moments to ensure it was secure.
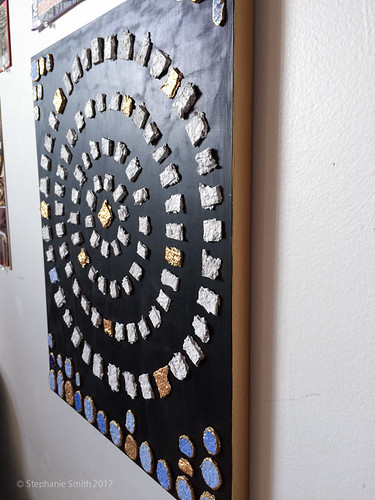
I went a little crazy trying to figure out on what kind of surface to mount the artifacts. I ended up using the cradled hardboard which I faux finished to look like black stained wood. The sides are painted gold.
I wanted the presentation to look curated, purposeful and artful.
This piece would become my submission to the 2016 Banana Factory Resident Artist Annual Exhibition. I'd considered submitting more than one piece but this was the best I could do in the short time between coming off of the 3 months I spent working on my TEDx presentation that year.
Here you can see my piece next to the work of my friend Jeff Ludwig-Dicus.
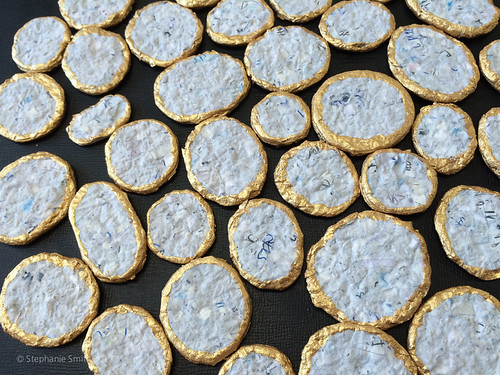
After the first piece made me quite happy which was a far cry from the way I'd felt so burdened right before I shredded the journals, I decided to make another one.
With this group of pieces, I decided I wanted to let some of the written artifacts peek through, so I coated these with a clear acrylic gesso (which is matte and has a bit of tooth) and painted the edges gold.
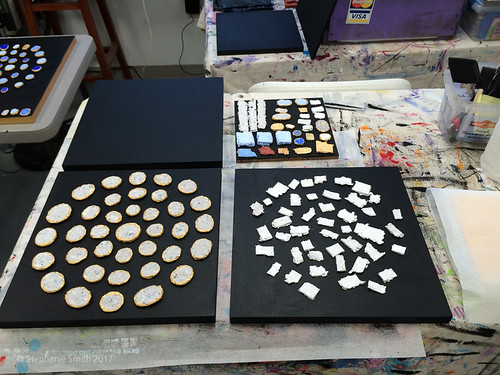
Here I am playing with layouts again.
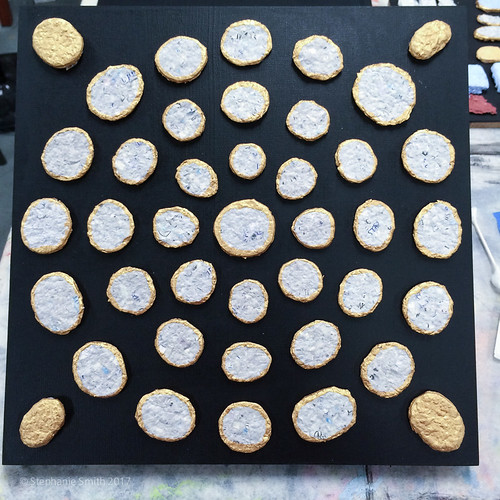
This is the final version of "Ancient History 2.0." 12x12" again on cradled hardboard with gold painted sides.
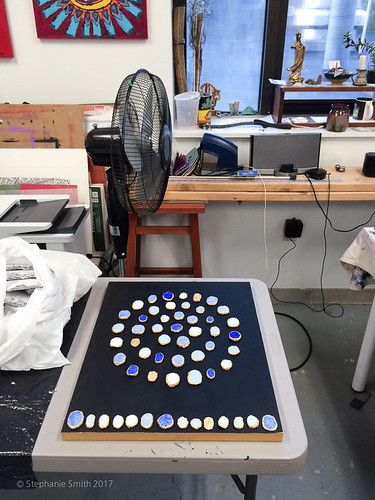
This was an attempt on a 3rd piece.
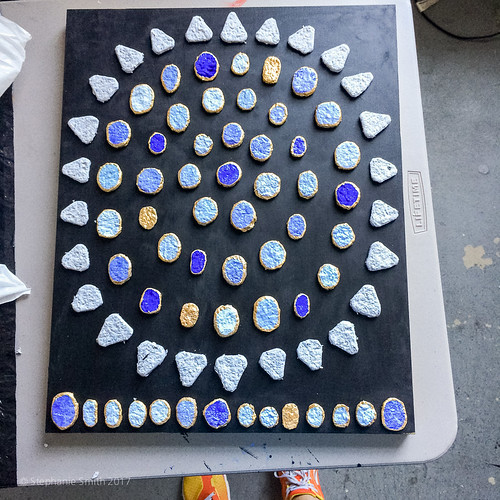
I liked this layout but wanted to paint the triangle shapes gold.
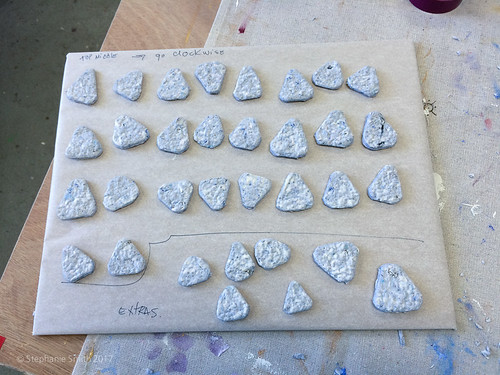
I removed them and placed them in order so I could assemble it as it was.
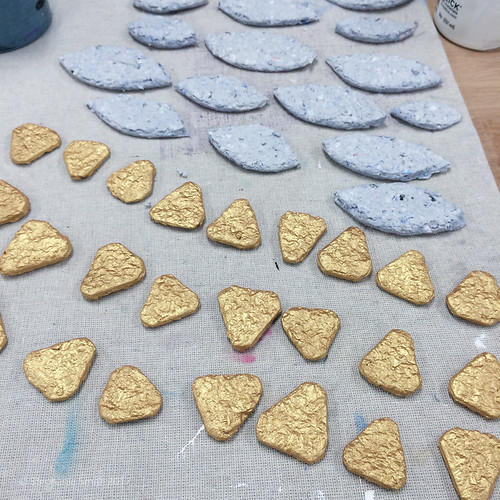
Painted gold, I never finished this piece. The pieces are currently sitting in a plastic bag. Maybe one day, I'll get back to it again.
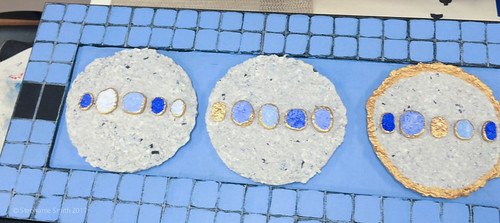
Remember when I talked about the paper forms I made with plastic plates? I coated these on both sides with clear gesso yet they still have a funky odor. This was me playing around with these forms for a potential exhibition. I did not create any pieces other than the first two, but you can watch the 2nd video below to see what might have been.
More recently, I’ve begun to kick around the idea of creating something else with a set of similar pieces- something asking to a personal set of runes. Stay tuned!
This is me talking about how I created this piece. If you can't see the two videos that are embedded in this post, please visit my blog directly to see them
As a reminder, you are receiving this post because you are subscribed to my blog at biffybeans.com. This is a separate subscription from my mailing list which you can join by adding your email address to the subscription box on the top left of the homepage on my blog.
I bought my first journal (a large blank Moleskine Reporter) in 2005. (Pen of choice at the time was a medium blue Paper Mate Stick) This book became my constant confidant for dream interpretation, stream of consciousness writing and other types of reflective writing practices.
Not long after after I began this practice, I developed a fair amount of pain in my right hand and wrist from the pressure needed for the ball point pen to deliver it's ink. Enter the fountain pen, (many, actually) which required little pressure to deliver the ink to the page. Add to that a hundred bottles of ink, and a few dozen more journals, and I was a happy camper. This became an extremely helpful practice (albeit expensive at times) to develop self awareness and I wouldn't trade it for the world.
To further my love for paper and the written word, I was granted the most glorious job- that of professional blogger for RhodaDrive.com. For 6 years I got to play with and write about paper and pens and writing. But I digress...

Fast forward a decade and I began to feel tremendously burdened by the box of old journals filled with so much bitching, whining and complaining- but I didn't yet know what to do with them. I'd thought about burning them, but didn't have a place for that to happen. Then one day last spring/summer (2016), I was suddenly inspired to shred them.
But first, I had to read them. Over 4000 excruciating pages of verbal diarrhea. This was brutal because I had a really hard time feeling compassion for the version of myself that wrote those words. Again and again I wanted to scream, "Get over it already!!!" Feeling so much frustration while reading the books, I began tearing them apart. Separating the pages so I could run them through the shredder meant seeing my words over and over and over again. None of this was easy. None of it.
When the shredding finally began, I couldn't do it fast enough and ran all the pages through the shredder with the widest part of the paper hitting the blades first. Bags filled with shreds later, I noticed something that made me to want to scream. Since I shredded the books longways, I could still see my words on the shredded paper. FUCK! I wanted SO MUCH to obliterate these words and these thoughts from my memory, so shredding them just wasn't good enough. So what could I do?
Then it came to me, pulp it. No real thoughts beyond that. Just, pulp it. My first trip was to Lowe's, where I bought three blue 5 gallon buckets with lids, a roll of nylon window screen, and a paint mixing attachment for my drill. For whatever reason, I opted not to blend the pulp to a smooth consistency. (Some people would use a blender but I felt like that would prolong the process even more.)
Filing the buckets with shreds, I boiled kettle after kettle and dumped hot water over the paper. This, like every part of this godforsaken process, took forever because I mistakingly thought that the paper would instantly dissolve when the hot water hit it. Ha!. It didn't. It soaked for days until it began to somewhat come apart with paint mixing attachment not being as helpful as I'd hoped. I began to manually agitate the paper with my hands then eventually with my whole arm up to the shoulder.
There was something really interesting and peaceful about that process - of plunging your arm into a bucket of purple paper pulp created from 20 years worth of written memories. It was like touching your life history in a whole different kind of way. (Despite using a rainbow of fountain pen inks, they somehow all blended into purple. Go figure.)
While I typically enjoy documenting and sharing the creative process, I took not a single photo during this time. I didn't photograph the books before I started, while I was tearing them apart, of me shredding them, or of the initial pulping process. Couldn't do it. Too personal. I was destroying a part of me and it had to just be me and it.
While the paper was slowing disintegrating in the blue buckets stacked in my kitchen, I began to watch YouTube videos on paper making. I had an idea of what to do, but I needed confirmation. The next trip to the store was to AC Moore where I bought two wooden frames to use as a mould and deckle and a dozen pieces of felt.
(This is where I began to document the process)

(In the image above, you can see that the shredded paper after soaking for something like a week was still somewhat chunky. Again, I could have chosen to use a blender to smooth it out but didn't. )
I stapled the nylon screen to one of the frames. It was a lot harder to staple into that wood than one might think - but then again, did I really expect ANY part of this process to be easy?
For the first batch of paper, I was submerging just one frame with the screen on the bottom. (Think panning for gold) While those sheets came out halfway decent, I watched a few YouTube videos and learned that with a proper "deckle and mould" the screen needs to be on top with a 2nd frame fitting over the screen to hold the pulp. The way I was doing it with the screen on the bottom was causing the screen to stretch and pulp to get caught in the areas between the staples and was making it difficult to flip the sheet out. For the second batch on, I awkwardly used the two frames as a deckle and mould set.
Of note: If there were cloth bookmarks in the books, they got shredded too - which is why you sometimes see black bits - though those are also sometimes from the front and back end covers of Rhodia Webnotebooks. Plastic Post-It flags also got shredded, though I picked them out as much as I could from the slop shown above.

This whole process- from skimming through the content, shredding, pulping, and then making paper was seemingly endless. I had shredded and soaked two five gallon buckets full of thick pulp. Should I ever decide to make paper again. I won't create more pulp than I can use in a single paper making session.
After blotting out as much water as I could with a sponge while the pulp was still on/in the mould, I'd then flip out the molded sheets of "paper" (all of which varied quite greatly in thickness due to my impatience) onto sheets of felt and then I'd blot some more... (I found recycled paper making process videos on YouTube which created a stack of alternating paper and felt which was pressed between sheets of wood and placed in a box with a fan for air circulation. I didn't do that.)

Over the course of about a month, I think I made 4 batches of about 15 9x12" pieces each. I also pressed some of the pulp into round plastic plate forms. When I mentioned above about how in the future, I'd only create as much pulp as I could use in a single session, this was because the pulp began to smell pretty funky after sitting around for a few weeks. I read that there were additives that could be put in the water to prevent this but I didn't pursue that. Whoops.
The bigger discs shown further down below, were my final attempts to use up the rest of the pulp because I was tired of making paper. They, along with the last batch of paper, still smell a bit sour... like vomit. Wheee!

This is what some of the dried sheets look like. Some are very thick. Most are a bit warped. Some of the words from the paper shreds are still visible. (And I'm ok with that)
Depending on the thickness of each sheet, they took on average about 4-5 days for them to fully dry outside. One batch I dried in the sun took a little less time, but the color of the paper (a light blueish grey) was more bleached out and somewhat darker around the edges.

Okay, so... I have all this recycled paper. Now what? After I started cutting out some random oval shapes, it didn't take long for inspiration to strike.

My first ever visit to the Metropolitan Museum of Art in New York City was in the spring of 2015 - a year before I began this project. Of all the wonderful and interesting things I saw on that trip, I found myself most attracted to the ancient Egyptian stone and ceramic scarab beetles.

I loved the shapes, the colors, and maybe most of all, the way they were so precisely laid out in the exhibits. I could have sat and looked at them for hours.

It became obvious that I was to create my own Ancient Historical Artifacts. (Considering some of the writing I shredded went all the way back to 1995, I'd say that's a pretty accurate description.)
I had to use heavy shears to cut these forms out of the thick sheets which was really hard on the hands.

First experiments to paint them were with watercolor and gouache, but as the paint soaked in and didn't offer the look I was aiming for, I quickly switched to acrylic.
(Completely in love with the various shades of Egyptian blue, I did my best to create my own version.)

Once I painted a variety of shapes, I began playing with laying them out. In this first image, they are temporarily sitting on top of 4 12x12" cradled hardboards which I'd covered with black acrylic gesso.

Still trying to find the right balance with the mandala design. These are now sitting on top of a 24x30" stretched canvas. (I abandoned the idea of using a stretched canvas because I didn't want to deal with the bounce of the canvas while trying to glue them down.)

This is the final version of the first piece of "Ancient History."
I'd initially tried to use a ruler and compass to lay out the circles but it didn't work they way I wanted. I wanted the circles to be more oblong than round, and so I had to carefully and painstakingly check and recheck the layout as I was gluing to ensure it didn't go wonky.
The gluing process was of course, equally time consuming. As the pieces were unpainted on the back, an art conservationist friend suggested I use an archival PVA glue (Jade 403) which I applied with a paintbrush. I'd first place the piece, then hold it firmly for several moments to ensure it was secure.

I went a little crazy trying to figure out on what kind of surface to mount the artifacts. I ended up using the cradled hardboard which I faux finished to look like black stained wood. The sides are painted gold.
I wanted the presentation to look curated, purposeful and artful.
This piece would become my submission to the 2016 Banana Factory Resident Artist Annual Exhibition. I'd considered submitting more than one piece but this was the best I could do in the short time between coming off of the 3 months I spent working on my TEDx presentation that year.
Here you can see my piece next to the work of my friend Jeff Ludwig-Dicus.

After the first piece made me quite happy which was a far cry from the way I'd felt so burdened right before I shredded the journals, I decided to make another one.
With this group of pieces, I decided I wanted to let some of the written artifacts peek through, so I coated these with a clear acrylic gesso (which is matte and has a bit of tooth) and painted the edges gold.

Here I am playing with layouts again.

This is the final version of "Ancient History 2.0." 12x12" again on cradled hardboard with gold painted sides.

This was an attempt on a 3rd piece.

I liked this layout but wanted to paint the triangle shapes gold.

I removed them and placed them in order so I could assemble it as it was.

Painted gold, I never finished this piece. The pieces are currently sitting in a plastic bag. Maybe one day, I'll get back to it again.

Remember when I talked about the paper forms I made with plastic plates? I coated these on both sides with clear gesso yet they still have a funky odor. This was me playing around with these forms for a potential exhibition. I did not create any pieces other than the first two, but you can watch the 2nd video below to see what might have been.
More recently, I’ve begun to kick around the idea of creating something else with a set of similar pieces- something asking to a personal set of runes. Stay tuned!
This is me talking about how I created this piece. If you can't see the two videos that are embedded in this post, please visit my blog directly to see them
As a reminder, you are receiving this post because you are subscribed to my blog at biffybeans.com. This is a separate subscription from my mailing list which you can join by adding your email address to the subscription box on the top left of the homepage on my blog.


